Virtru SDK for JavaScript · 
The Virtru SDK allows developers to securely and easily encrypt and manage authenticated access to sensitive data. This comprehensive documentation serves as the source of truth for the functionality and usage of the Virtru JavaScript SDK.

For more information, please join us on Slack.
UPGRADING
From 3.x
We have changed the authorizor module API. Instead of the mutating injectAuth, we now have the
withCreds function which returns a promise of a new request. Behind the scenes, we have migrated
to a new, open source core.
We have removed nodeJS support. To support a node service, you will have to implement your own authentication middleware, and load a few polyfills (depending on version).
From 2.x
After 2.0, the library has started transitioning away from 'node-first' libraries to prefer web APIs
where available. Notably, the 'stream' objects returned by encrypt and decrypt no longer extend
the node streams Passthrough object, but instead make a runtime-specific property available called
stream.
Core Concepts
- TDF Ciphertext - Ciphertext encrypted using the open TDF specification.
- Each TDF ciphertext is created using a unique data key and managed with independent access controls.
- Virtru Policy - A policy specifying access controls that will be enforced on encrypted data, such as expiration and authorized users.
- User - An entity authenticated with Virtru. SDK users can grant and revoke other users'
access to encrypted data. For instance,
alice@example.comcan authorizebob@example.comaccess to some encrypted data, either at encryption-time or any time afterward.
Getting Started
The SDK is also available in minified, browser-ready form via
NPM. It can be accessed as es6 module
import * as Virtru from 'virtru-sdk', or accessible through window object window.Virtru.
Further, we will use Protect and Track demo app as
examples
0. Install packages from npm
- run
npm i virtru-sdk -Sto install sdk - you need to install OIDC client. In order to do
that - crate a file
.npmrcand add this line:@virtru:registry=https://npm.pkg.github.com - run
npm i @virtru/oidc-client-js -S
1. Get an identity
So Alice, who should own your sensitive data? You, obviously!
Authenticate to associate your email address (e.g. alice@example.com) with any data you protect. You cannot protect data without authenticating. If the Virtru Platform doesn’t know who’s protecting data, no one would be able to access it later (when they’re also asked to authenticate).
import { OidcClient, IdentityProvider } from '@virtru/oidc-client-js';

// where oidcConfig example is
const oidcConfig = {
  // ↓ check 1password/Developers/oidc-client-js for that id
  clientId,
  // ↑ check 1password/Developers/oidc-client-js for that id
  redirectUri: window.location.origin,
  postLogoutRedirectUri: window.location.origin,
  scope: 'openid profile email offline_access',
  authServiceBaseUrl: 'https://api.virtru.com/auth',
  authorizationEndpoint: 'https://virtru.com/oauth2/default/v1/authorize',
  tokenEndpoint: 'https://virtru.com/oauth2/default/v1/token',
  revokeEndpoint: 'https://virtru.com/oauth2/default/v1/revoke',
  logoutEndpoint: 'https://virtru.com/oauth2/default/v1/logout',
  storageKeyUniqueId: 'pt-dev01',
};

const oidcClient = new OidcClient(oidcConfig);
Example of configuration for different environment is here.
2. Ask for sensitive data
Next we need to initiate login by calling loginWithRedirect After successful logging in, youll get
redirected back to url you defined in redirectUri with additional query params we can use this
time authenticate. Call handleLoginRedirectResult method so oidc can be used now for encryption
if (queryParams.get('code') && queryParams.get('state')) {
  await oidcClient.handleLoginRedirectResult();
} else {
  oidcClient.loginWithRedirect(
    IdentityProvider.Google // we also have Microsoft
  );
}
↑↑↑ With that code snippet you'll ether be redirected to login page ether receive everything that necessary for encryption.
3. Protect the sensitive data
To protect your sensitive data, we’ll need a Virtru client. We’ll associate anything you encrypt with your email:
import * as Virtru from 'virtru-sdk';

const clientConfig = {
  acmEndpoint: 'https://api.virtru.com/acm',
  auditEndpoint: 'https://audit.virtru.com',
  easEndpoint: 'https://api.virtru.com/accounts',
  kasEndpoint: 'https://api.virtru.com/kas',
  readerUrl: 'https://secure.virtru.com/start?htmlProtocol=1',
  rcaEndpoint: 'https://api.virtru.com/rca',
  storageEndpoint: 'https://api.virtru.com/encrypted-storage',
};

const authProvider = new Virtru.OidcProvider(oidcClient);
virtruClient = new Virtru.Client({ ...clientConfig, email, authProvider });
Next, decide your encryption options. For now, it’s the string containing your sensitive data. In the future, this could include who else should have access and under what conditions.
// Configure and execute an encrypt.
// The creator (alice@example.com) always has access, so we don't need to specify him as an authorized user.
const encryptParams = new Virtru.EncryptParamsBuilder()
  .withStringSource('Sokath, his eyes open!')
  .withUsersWithAccess(['picard@enterprise.fed'])
  .build();
Finally, since the encrypt call is asynchronous, we’ll wait for it to finish:
const ciphertextStream = await client.encrypt(encryptParams);
console.log(await ciphertextStream.toString());
4. Access the sensitive data now
Now, let’s say you need to see your sensitive data again immediately. Well, you’re still authenticated as alice@example.com so you can decrypt the ciphertext:
// Ask for sensitive data
const plainText = prompt('Type something to encrypt: ', 'sensitive data...');

// Client will enable all other work
const client = new Virtru.Client({ ...clientConfig, email, authProvider });

// Protect the sensitive data
async function encryptToString(plain) {
  const encryptParams = new Virtru.EncryptParamsBuilder()
    .withStringSource(plain)
    .withDisplayFilename('sensitive.txt')
    .build();
  const ciphertextStream = await client.encrypt(encryptParams);
  const ciphertext = await ciphertextStream.toString();
  return ciphertext;
}
let ciphertext = await encryptToString(plainText);

// Access the sensitive data now
async function decryptFromString(ciphertext) {
  const decryptParams = new Virtru.DecryptParamsBuilder().withStringSource(ciphertext).build();
  const plaintextStream = await client.decrypt(decryptParams);
  const plaintext = await plaintextStream.toString();
  return plaintext;
}
let decrypted = await decryptFromString(ciphertext);

// Validate that the original value and its decrypted version are the same.
if (plainText === decrypted) {
  alert('The decrypted string matches your original one!');
} else {
  alert(`ERROR: Output, [${decrypted}], does not match input, [${plainText}]`);
}
But what if you close this tab or stop your web server? We need to remember the sensitive data we protected to access it later.
5. Access the sensitive data again later
The Virtru SDK lets you save your ciphertext as an HTML file you can open again later.
const plainText = prompt('Type something to encrypt: ', 'sensitive data...');
const client = new Virtru.Client({ ...clientConfig, email, authProvider });

// Protect the sensitive data
const displayFileName = 'sensitive.txt';
const encryptParams = new Virtru.EncryptParamsBuilder()
  .withStringSource(plainText)
  .withDisplayFilename(displayFileName)
  .build();
const ciphertextStream = await client.encrypt(encryptParams);
await ciphertextStream.toFile(encryptedFilename);
6. Access the sensitive data anywhere
If you inspect the generated HTML file, you still won’t find your sensitive data. It stays protected. You can send that HTML file to another machine or anywhere you want. Only you will be able to access it. But how do you do that outside of this code?
We could build a whole set of functionality to authenticate, decrypt, and render files. Or we could use Virtru’s Secure Reader, which is built to do exactly that for thousands of security-conscious users every day. In fact, if you open that HTML file from the last step, it will redirect you to Secure Reader.
Secure Reader will ask you to authenticate. (You’re still Alice, aren’t you?)
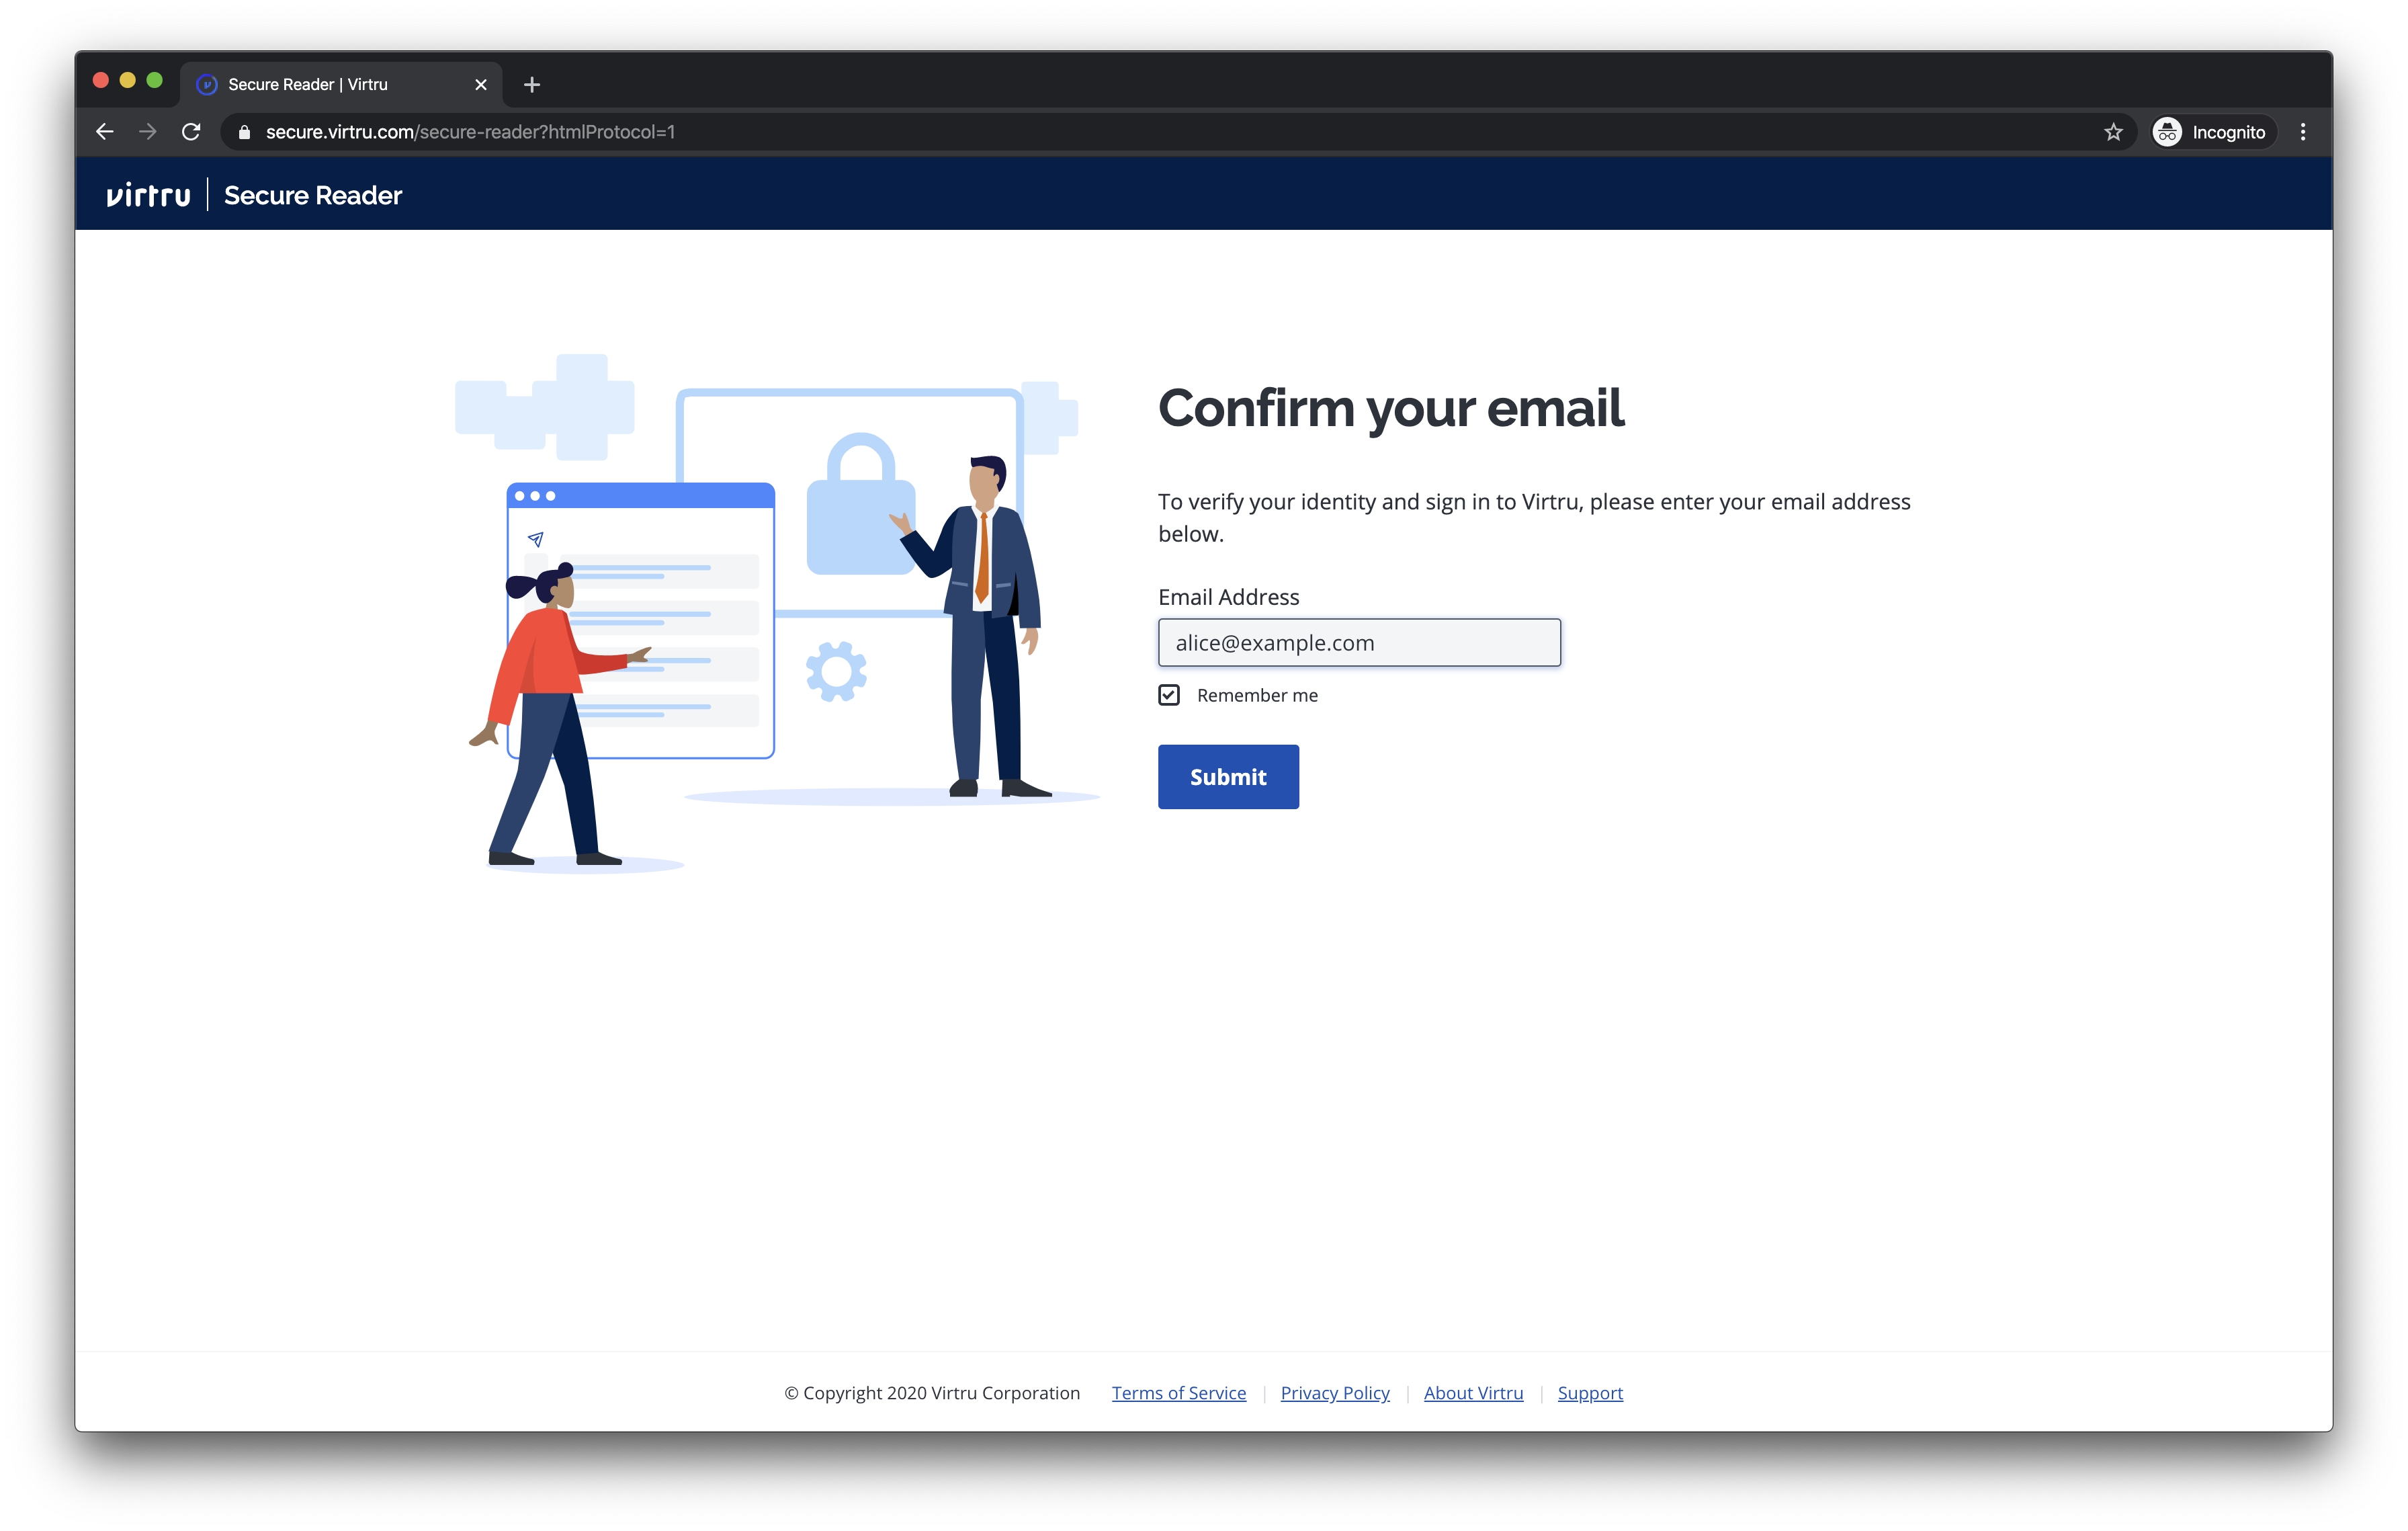
And if you authenticate with the same email address you used to create the HTML file, you should be able to view it in Secure Reader:
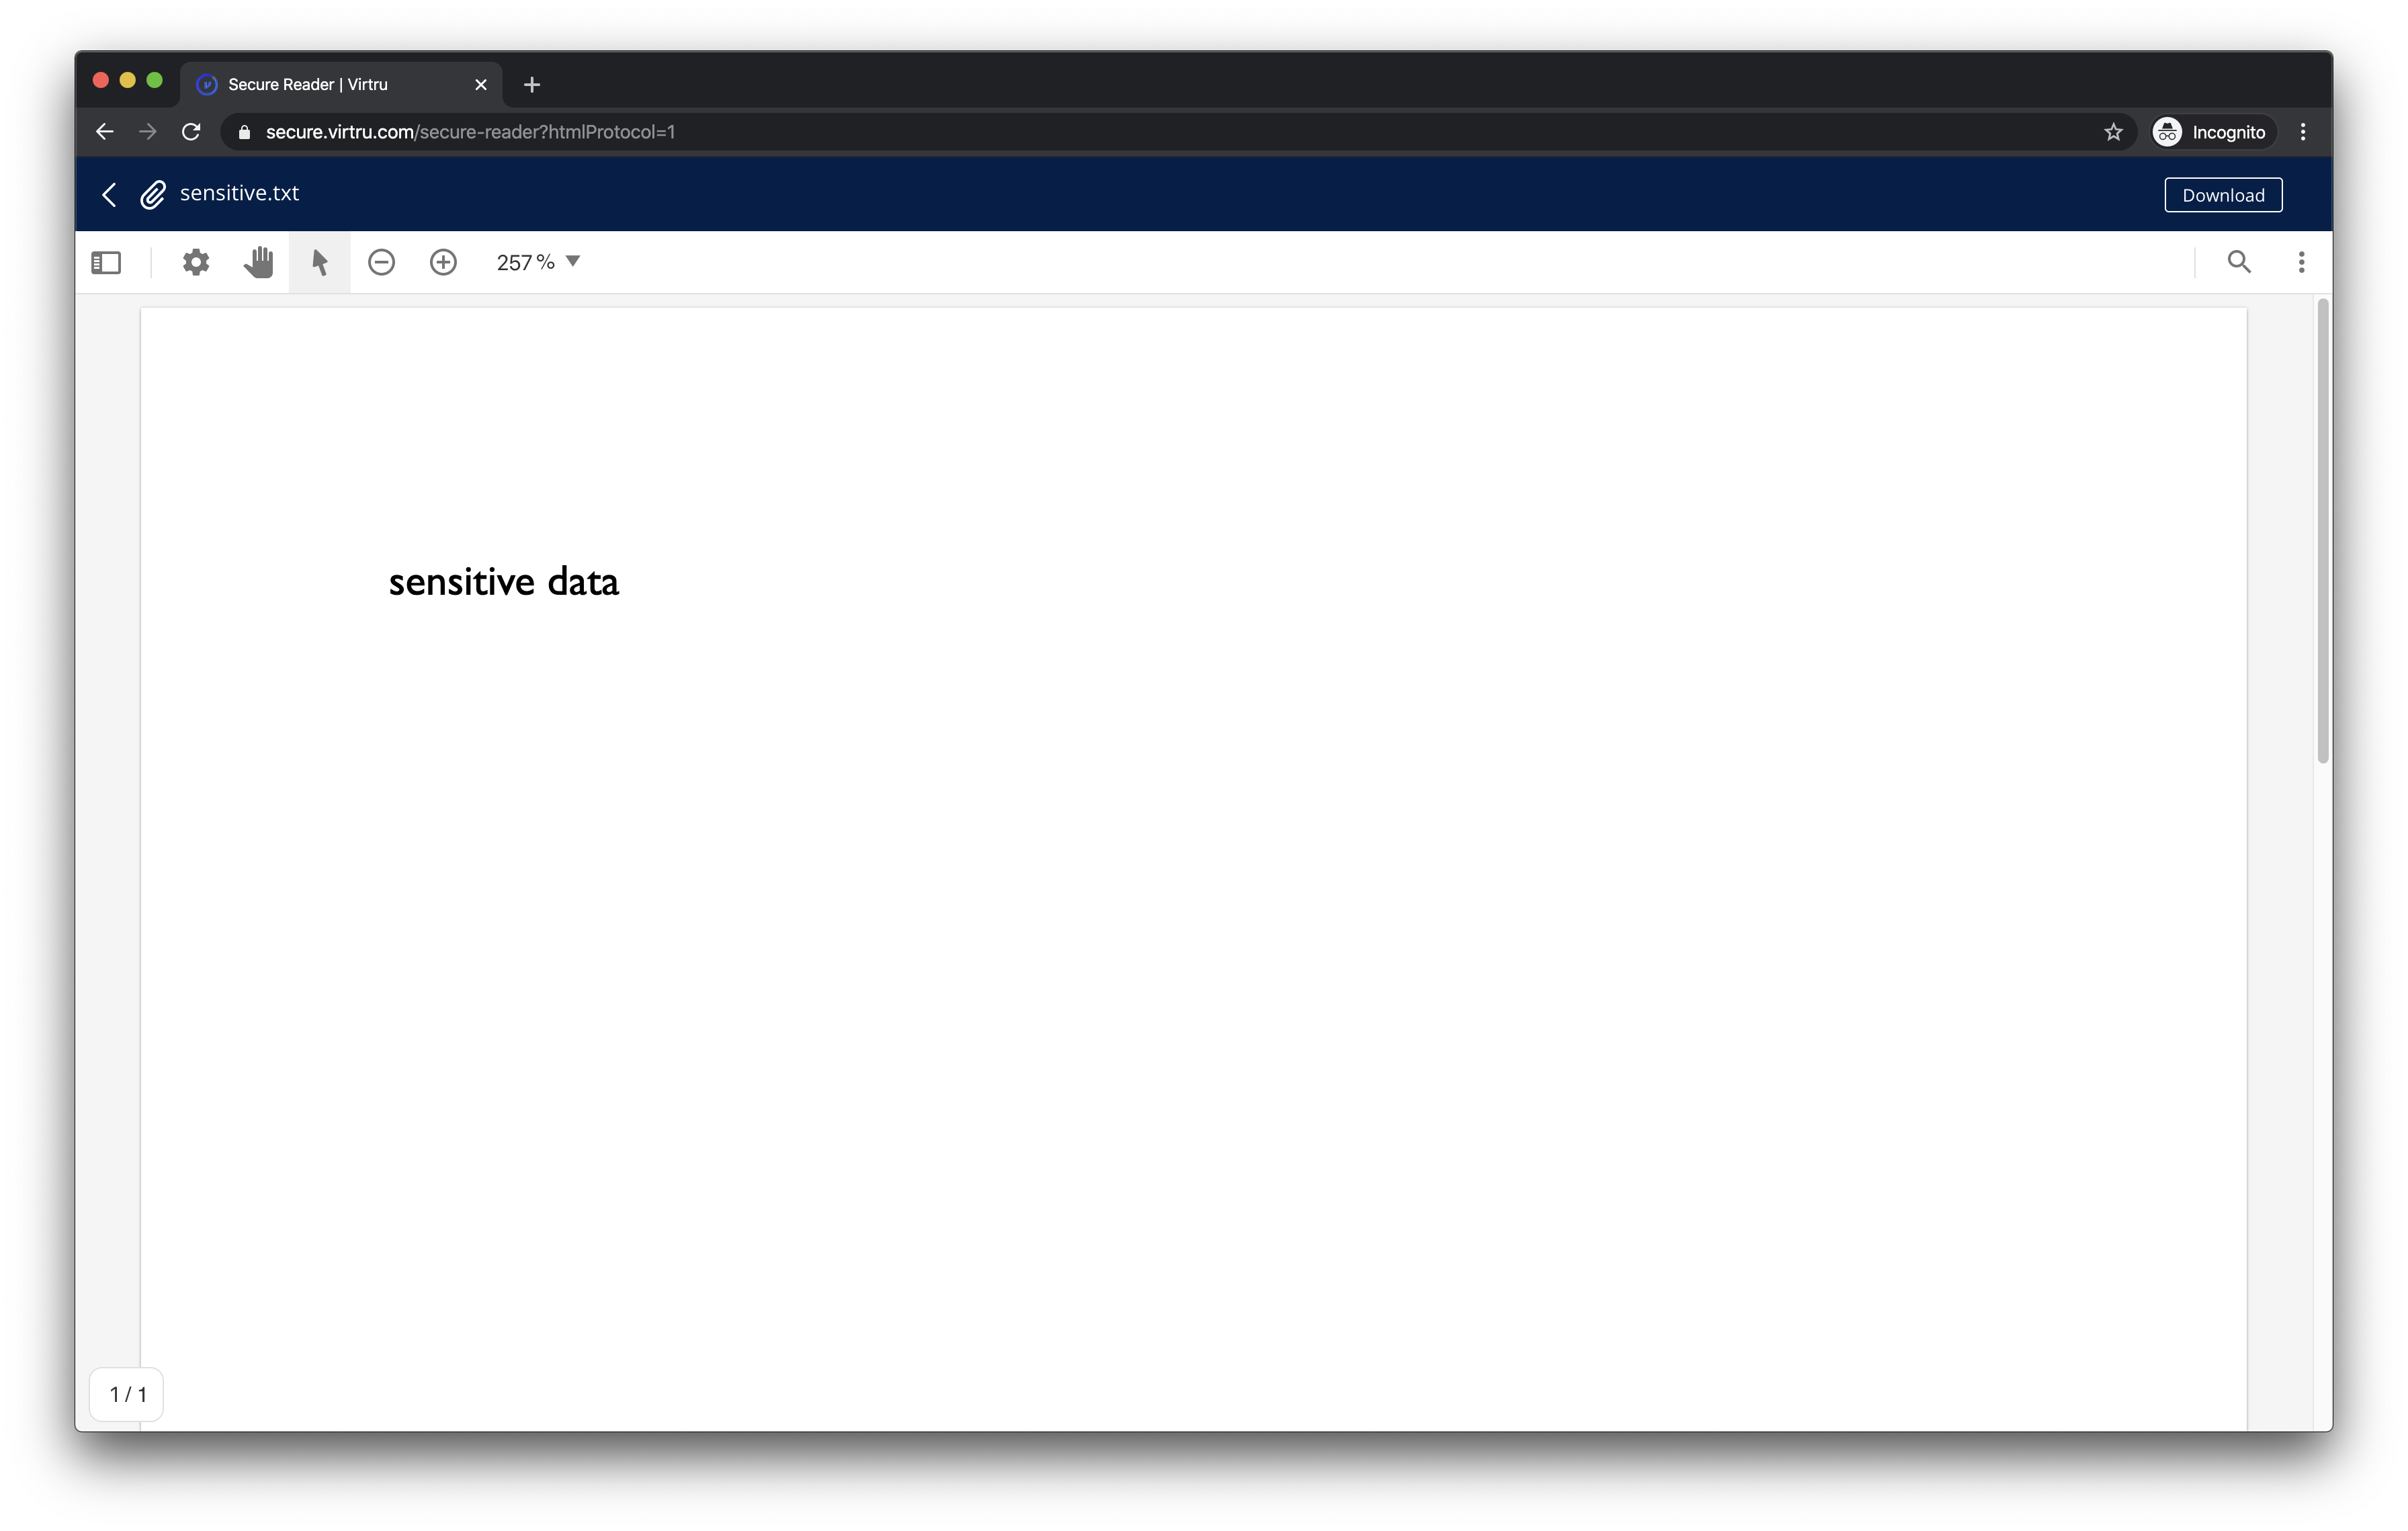
Congrats Alice! Your sensitive data is safe wherever it goes.
7. Email codes auth
Another type of authentication. Email codes are alphanumeric codes that prove your identity for a short session. Codes expire in 15 minutes.
The Virtru SDK lets you send email codes to alice@example.com:
Virtru.Auth.sendCodeToEmail({ email: 'alice@example.com' });
You would then check alice@example.com’s inbox and copy the code from the Virtru email. And submit that code back to the SDK:
Virtru.Auth.activateEmailCode({
  email: 'alice@example.com',
  code: 'V-12345678',
});
If the code submitted matches the code sent, the Virtru JavaScript SDK remembers your authentication status. You can confirm that by checking:
Virtru.Auth.isLoggedIn();
Encryption Lifecycle
That one little encrypt call did a lot of work behind the scenes to keep your sensitive data safe:
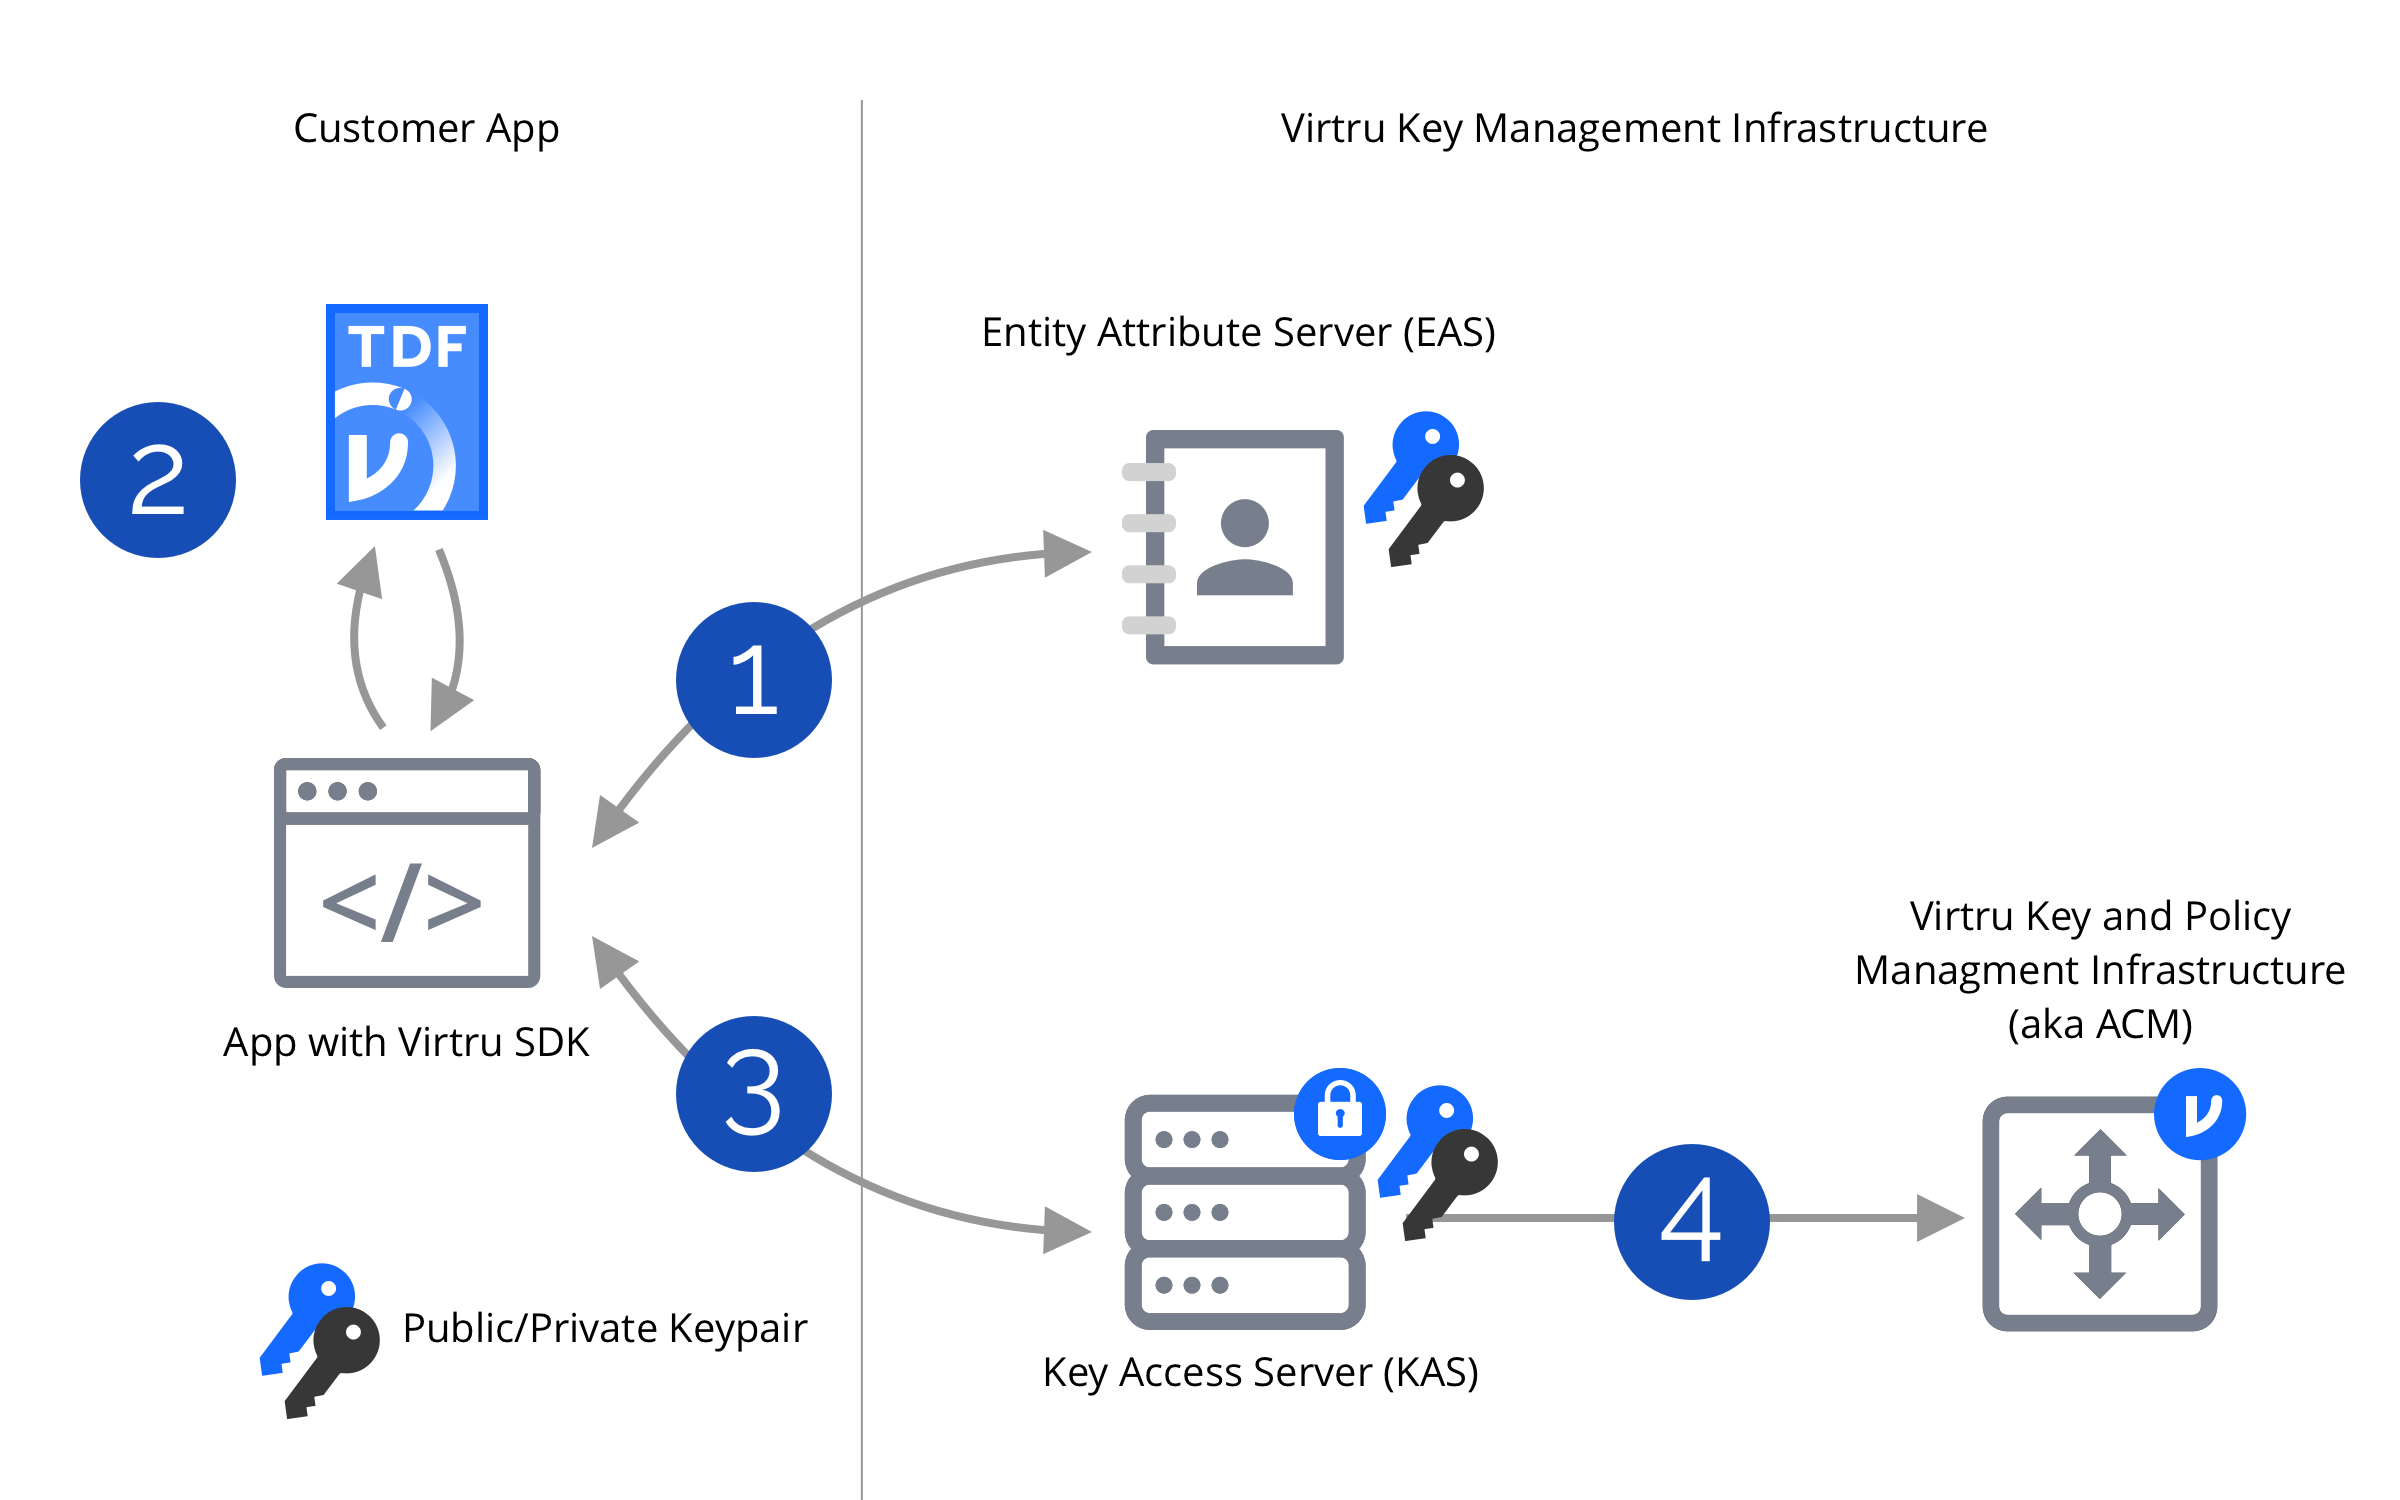
- Step 1: Your app authenticates with Virtru's entity service.
This was when you proved you were alice@example.com. - Step 2: Then, an encrypt call protects any given data as ciphertext. This ciphertext is local to where encrypt was called (a browser, end user device, or server). Although encrypt uses the open Trusted Data Format (TDF), you can save the ciphertext in a file format that you can open anywhere—HTML. This was when your sensitive data became protected.
- Step 3: While an encrypt call keeps the protected data as local ciphertext, a secure decryption key travels back to Virtru’s key server for safe-keeping. But this key server doesn’t hand out keys to anyone… This is why you don’t have to manage keys yourself.
- Step 4: While an encrypt call keeps the protected data as local ciphertext, the SDK saves the
access controls for the protected data in Virtru’s access server. The access server determines if
a particular authenticated user (Step 1) can access protected data (Step 2) using a decryption key
(Step 3).
*This is the crucial backend you don’t have to build or host. It never has access to your local data.*
Encrypted File Formats
We generated a .html file above. This is the SDK default, but not the only option. We also have
implementation of a zip file format that called .tdf.
| HTML Format | ZIP Format | |
|---|---|---|
| File Extension | .html | .tdf |
| File Size | File sizes less than 100 MB | Any file size |
| Decryption | Any Virtru SDK | Any Virtru SDK |
| User Experience | Open file anywhere to redirect to Virtru's Secure Reader | Sdk decryption only |
If you need a protected ZIP file, add it to the encrypt params and set the file extension:
const encryptParams = new Virtru.EncryptParamsBuilder()
  .withStringSource(unprotectedString)
  .withDisplayFilename(originalFileName)
  .withZipFormat() // ZIP format
  .withPolicy(policy)
  .build();
const protectedStream = await client.encrypt(encryptParams);
await protectedStream.toFile(`${originalFileName}.tdf`);
Common Use-Cases
This section lists some example usages using the Virtru SDK.
Example: HTML File input encryption
Add event handler for your file input
Get File object from event handler
async function fileEncrypt(file) {
  // Configure the encrypt parameters to encrypt a provided string.
  const arrayBufferPayload = await file.arrayBuffer();
  const encryptParams = new Virtru.EncryptParamsBuilder()
    .withArrayBufferSource(arrayBufferPayload) // withStreamSource also an option
    .build();

  // Run the encrypt and write the result to stdout.
  const ct = await client.encrypt(encryptParams);
  await ct.toFile(`${file.name()}.html`);
}

async function fileDecrypt(file) {
  // Configure the encrypt parameters to encrypt a provided string.
  const arrayBufferPayload = await file.arrayBuffer();
  const encryptParams = new Virtru.DecryptParamsBuilder()
    .withArrayBufferSource(arrayBufferPayload) // withStreamSource also an option
    .build();

  // Run the encrypt and write the result to stdout.
  const ct = await client.decrypt(encryptParams);
  await ct.toFile(file.name().replace('.html', ''));
}
Example: Encrypting data with expiration.
// Initialize the client and destination directory.
const client = new Virtru.Client({ ...clientConfig, authProvider });
// Construct an authorization policy to apply to the encrypted data.
// Note that *expiration only applies to other users*, not the creator.
const policy = new Virtru.PolicyBuilder()
  .enableExpirationDeadlineFromNow(60) // Expires in one minute.
  .build();

// Configure the encrypt parameters to encrypt a provided string.
const encryptParams = new Virtru.EncryptParamsBuilder()
  .withStringSource('I expire in 60 seconds')
  .withUsersWithAccess(['bob@example.com', 'charlie@example.com'])
  .withPolicy(policy)
  .build();

// Run the encrypt and write the result to stdout.
const ct = await client.encrypt(encryptParams);
await ct.toFile('expiresSoon.html');
Example: Revoke Access
Let’s say Bob leaves your circle of trust. It’d be great if he no longer had access to your sensitive data. Revoke will prevent Bob from decrypting your sensitive data:
const client = new Virtru.Client({ ...clientConfig, authProvider });

const params = new Virtru.DecryptParamsBuilder().withArrayBufferSource(protectedFile).build();
const policyId = await client.getPolicyId(params);
const existingPolicy = await client.fetchPolicy(policyId);

// revoke access for user(s)
const users = ['bob@example.com'];
const updatedPolicy = existingPolicy.builder().removeUsersWithAccess(users).build();
await client.updatePolicy(updatedPolicy);
// if you want to rerevoke all access from it you can just do await client.revokePolicy(policyId);`
console.log(`Revoked access from users: ${users} on encrypted file`);
Example: Watermark Access
Trust doesn’t have to be absolute. If you want Bob to access your sensitive data, but discourage him from sharing it, you can enable watermarking:
const client = new Virtru.Client({ ...clientConfig, authProvider });

const params = new Virtru.DecryptParamsBuilder().withArrayBufferSource(protectedFile).build();
const policyId = await client.getPolicyId(params);
const existingPolicy = await client.fetchPolicy(policyId);

// watermark access
const updatedPolicy = existingPolicy
  .builder()
  .enableWatermarking() // .disableWatermarking() if you want remove it
  .build();
await client.updatePolicy(updatedPolicy);
Example: Encrypting and uploading a file to S3.
// Initialize the Virtru and S3 clients.
const client = new Virtru.Client({ ...clientConfig, authProvider });
const s3 = new AWS.S3();
// Derive the object key to use by appending .html for easy browser support.
const key = `${localFilename}.html`;
const encryptParams = new Virtru.EncryptParamsBuilder()
  .withFileSource(localFilename)
  .withDisplayFilename(localFilename)
  .build();
// The returned stream can be passed directly to s3.upload().
client
  .encrypt(encryptParams)
  .then((ct) =>
    s3.upload({ Body: ct, Bucket: bucketName, Key: key, ContentType: 'html/text' }, onComplete)
  );

function onComplete(err, data) {
  console.log(`${localFilename} encrypted and uploaded to S3 as ${key}`);
}
Example: Setting users to be authorized after encryption.
// Configure the encrypt parameters to encrypt a provided string.
const client = new Virtru.Client({ ...clientConfig, authProvider });
const encryptParams = new Virtru.EncryptParamsBuilder().withStringSource('Secrets!').build();
const policyId = encryptParams.getPolicyId();

// Run the encrypt and write the result to stdout.
const ct = await client.encrypt(encryptParams);
await ct.toFile('secrets.html');

// Time passes...

// Sometime later we decide to grant bob access to the data.

// First we fetch the Policy. This MUST be done before updating it.
// We assume the policyId is still in memory - if not it can be pulled from the TDF ciphertext
// using `client.getPolicyId(decryptParams)`.
const policy = await client.fetchPolicy(policyId);

// Update the policy locally, adding the new user.
const updatedPolicy = policy.builder().addUsersWithAccess('bob@example.com').build();

// Commit the update to the Virtru backend.
await client.updatePolicy(updatedPolicy);

// Now bob can decrypt!
Example: save TDF in S3 bucket using presigned links and allow to share them using RCA links
const client = new Virtru.Client({ ...clientConfig, authProvider });
const policy = new Virtru.PolicyBuilder()
  .addUsersWithAccess(['virtrutester1test@gmail.com', 'olegnikitindev@gmail.com'])
  .build();
const encryptParams = new Virtru.EncryptParamsBuilder()
  .withZipFormat()
  .withRcaSource()
  .withFileSource('img.jpg')
  .withDisplayFilename('img.jpg')
  .withPolicy(policy)
  .build();
const stream = await client.encrypt(encryptParams);
const resultUrl = await client.generateRcaLink(stream);
Example: decrypt file using presigned links
const client = new Virtru.Client();
const rcaLinkString =
  'https://secure.virtru.com/start/#v=3.1.0&pu=https%3A%2F%2Fapi.virtru.com%2Facm%2F93f9fdcb-f859-4ac1-a120-64e009b44622%2Fcontract&wu=https%3A%2F%2Fstorage-develop01.develop.virtru.com%2Fapi%2Fpolicies%2F93f9fdcb-f859-4ac1-a120-64e009b44622%2Fdata%2Fpayload&wk=%2BM4BmG3gCJvjIl9RZetD4d6A4AEQ5vqqF76GlyLw4B6m%2BHVmzmbdlAKXHTv8AuPgou3LLMP0rAi4DRwI&al=AES-256-GCM';

const decryptParams = new Virtru.DecryptParamsBuilder().withRcaSource(rcaLinkString).build();
const ct = await client.decrypt(decryptParams);
await ct.toFile('img_decr.jpg');
CORS and Domain Origin Policy in the Browser
To work with the Virtru KAS, this client loads a cross-domain proxy. To avoid loading the proxy, for
debugging purposes, you may change the module load to
require('virtru-sdk/dist/browser/virtru-sdk.internalClient.min.js').
Getting Help
There are many ways to get our attention.